In today’s digital age, being able to capture what’s on your laptop screen is a handy skill that can come in useful for various purposes, from saving important information to sharing funny memes with friends. If you’re new to the world of screenshots, fear not! We’ve got you covered with this beginner-friendly guide on how to take screenshots on your laptop.
Laptop Screenshot Types:
1. Know Your Options:
Before diving into the specifics, it’s essential to understand that there are multiple ways to take a screenshot on a laptop, depending on your operating system (OS) and personal preference. The two most common methods involve using keyboard shortcuts or built-in software.
2. Using Keyboard Shortcuts:
For Windows Users:
- Full Screen: Press the “PrtScn” or “Print Screen” key located on your keyboard. This will capture the entire screen.
- Active Window: To capture only the active window, press “Alt + PrtScn” simultaneously. This is particularly useful when you have multiple windows open, and you only want to capture one.
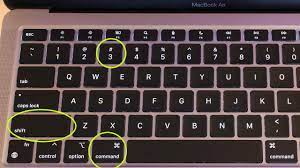
For Mac Users:
- Full Screen: Press “Command + Shift + 3” to capture the entire screen.
- Selected Area: If you want to capture only a specific area of your screen, press “Command + Shift + 4” and then click and drag your cursor to select the desired area.
3. Using Built-in Software:

Many laptops come with pre-installed software that allows you to take screenshots with additional features, such as annotation and editing. For Windows users, the “Snipping Tool” or “Snip & Sketch” app (Windows 10 and later) provides these capabilities. On Mac, the “Grab” utility can be found in the “Applications > Utilities” folder.
4. Saving and Sharing Your Screenshot:
Once you’ve captured your screenshot, it’s time to save or share it according to your needs. By default, screenshots on Windows are saved to the “Pictures > Screenshots” folder, while Mac saves them to the desktop. However, you can also paste the screenshot directly into an application like Microsoft Paint or Word for further editing or save it to a location of your choice.
If you’re looking to share your screenshot instantly, many applications and platforms allow you to paste the screenshot directly from your clipboard. Simply press “Ctrl + V” (Windows) or “Command + V” (Mac) to paste the screenshot into an email, document, or messaging app.
5. Practice Makes Perfect:
Like any skill, mastering the art of taking screenshots may take some practice. Experiment with different methods and familiarize yourself with the keyboard shortcuts or software features that best suit your needs.
With these simple steps, you’ll be capturing screenshots like a pro in no time! So go ahead, unleash your creativity, and start capturing those memorable moments or important information with ease. Happy screenshotting